A camera that makes phone calls.
Five years ago in his review of the iPhones 11, John Gruber wrote:
Several times over the past few years, I’ve had conversations along the lines of, “I know they’re never going to do this, but wouldn’t it be cool if Apple made a real camera?” As the iPhone camera system evolves, I’m starting to think Apple *is* making a real camera, right under our noses — or perhaps better said, right in our pockets.
The iPhone is the best camera for most people. I’ve been using it for 14 years. Let’s explore some iPhone camera tips, including some that aren’t the ones you hear everywhere.
So Many Options to Launch the Camera
As a great paper company manager once said:

You miss 100% of the shots when the camera app isn’t open. Here’s how to get into it from any number of angles:
- The app icon, of course.
- Through Control Center (swipe down from the upper right corner).
- Pressing and briefly holding on the camera icon in the lower right corner of the lock screen. With iOS 18 (released September 2024), you have the option to remove the camera icon from the lock screen if you choose. You are also be able to replace it with the launcher icon for an alternative camera app if you prefer something other than the native Apple camera app.
- Swiping right from the lock screen.
- Using the Back Tap accessibility gesture.
Eliminate Distracting Notifications During Photography
You’re in your element, making photos, and then this happens:
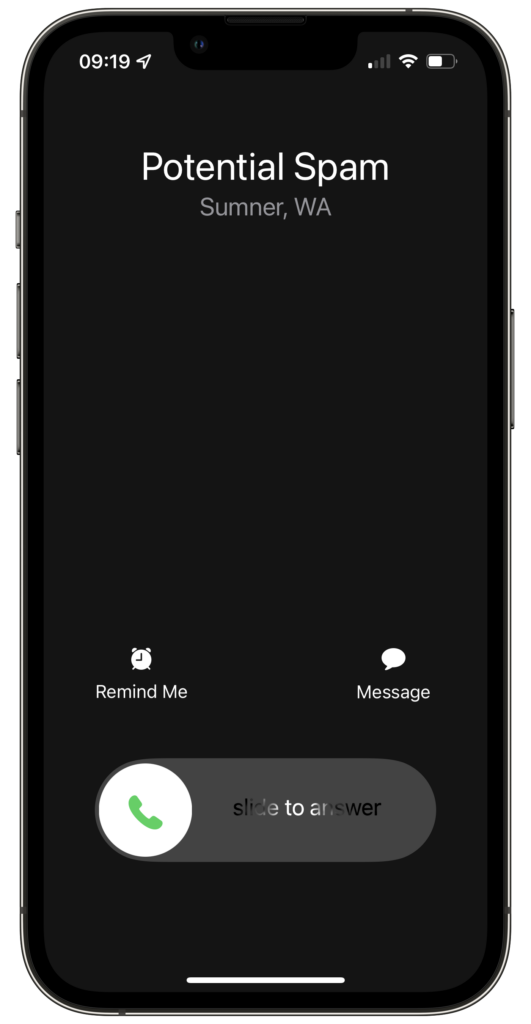
Create an iOS Focus Mode to eliminate notifications while you’re using camera apps. Here’s how to set that up.
Expose and Recompose
On a big camera, you’ll probably ensure your exposure and focus are correct and then you’ll get the composition you desire with the right things in (or out of) the frame. You can do the same thing on your iPhone.
You likely know that tapping in the camera’s viewfinder screen area will set the focus and exposure based on where you tapped. You may have also discovered that once you tap, you can slide your finger up to raise or lower the exposure (make it brighter or darker overall).
By tapping and holding, you won’t just set the exposure and focal point, but you’ll lock them in. You’ll see “AE/AF LOCK” appear as shown below. At that point you can move the phone and recompose your image, and the settings won’t change. If you decide you don’t like the locked-in values, you can tap and hold a second time to clear it.
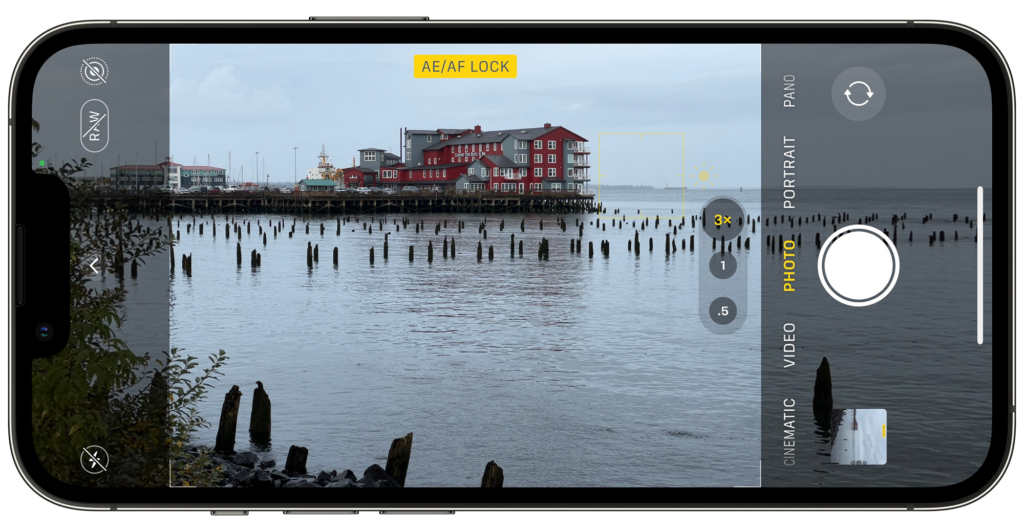
When Apple announced the iPhones 16, they indicated that a software update later in 2024 would enable the new Camera Control button to be used similar to a traditional DSLR or mirrorless camera shutter button. A light press to set focus, and then continued press to activate the shutter and capture the image. I look forward to trying this out!
Hidden iPhone Camera Controls
Apple has a bunch of camera controls available in the camera interface that are hidden by default. There are two ways to show them. You can either hit the upward chevron at the top of the screen as shown in the blue arrow below, or you can swipe up in the camera viewfinder area. Either way, you’ll then see the new control options appear above the shutter button:
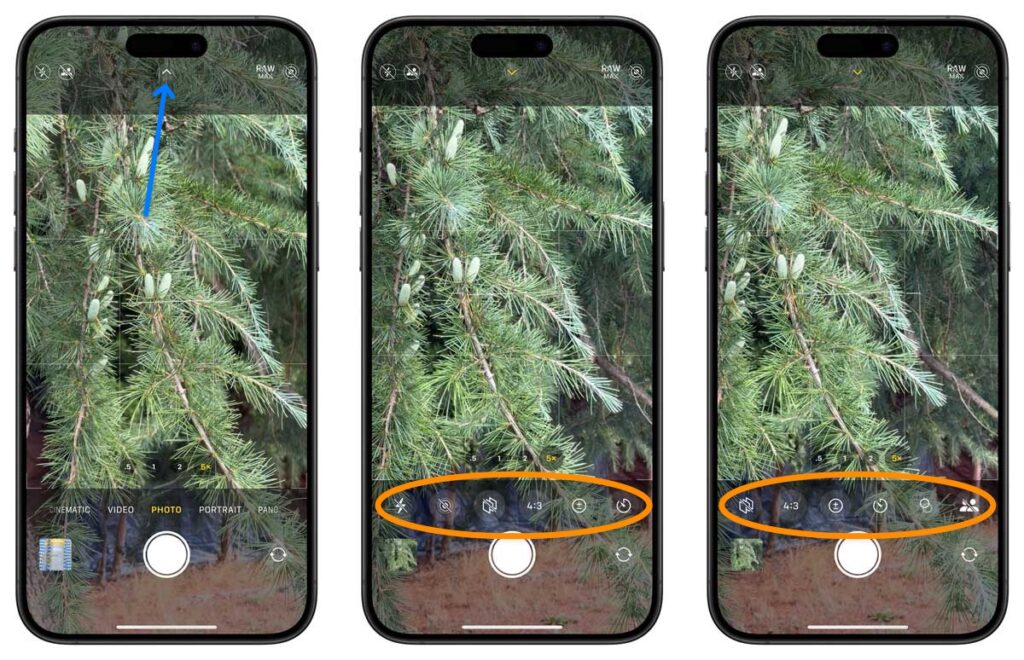
Explore these options. Some are a second interface for things that can be adjusted elsewhere, but some only exist within this hidden menu area. Here are a few of note:
- Exposure: Manually increase or decrease the overall exposure.
- Self Timer: Set a 3-second or 10-second self timer so that the capture is made after you’ve pressed the button. Perfect when you’re using a tripod and want to ensure you’re in the photo.
- Filters: Want to give your images a certain look right at capture? Apply a filter.
Composition Tools
The native iPhone camera app includes a few tools to help you compose better images at the time of capture. These settings can be found by going to Settings → Camera and scrolling down to the section labeled “COMPOSITION.”
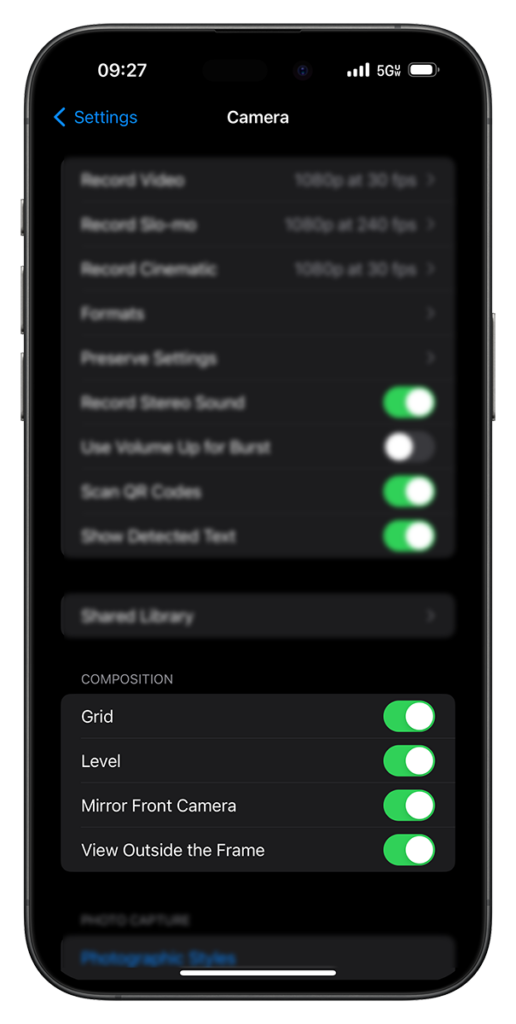
Here’s what they do.
Grid
As you might expect, the setting named “Grid” displays a grid over the camera view. This will split the screen into nine segments, dividing it in thirds each direction, and gives you a visual representation of the “Rule of Thirds” compositional guideline.
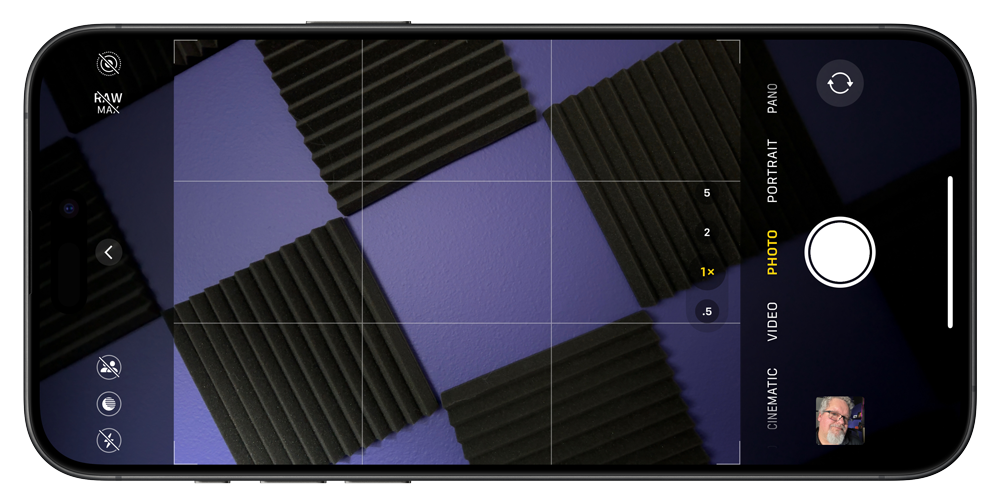
All other things being equal, you can strengthen your composition by putting the main points of interest of your photograph where those lines intersect. These four points are often called the four “power points” in an image.
Level
With the level option enabled, you’ll get a small subtle level directly in the middle of the viewfinder screen. As your camera approaches a level position, you’ll see that there are horizontal lines on the outer middle section of the screen, and a line between them that, as you tilt, will get closer and closer to lining up.
When you hit that level point, you’ll see the lines form one continuous line. The line will change from white to yellow, and you’ll get a subtle bit of haptic feedback as well.
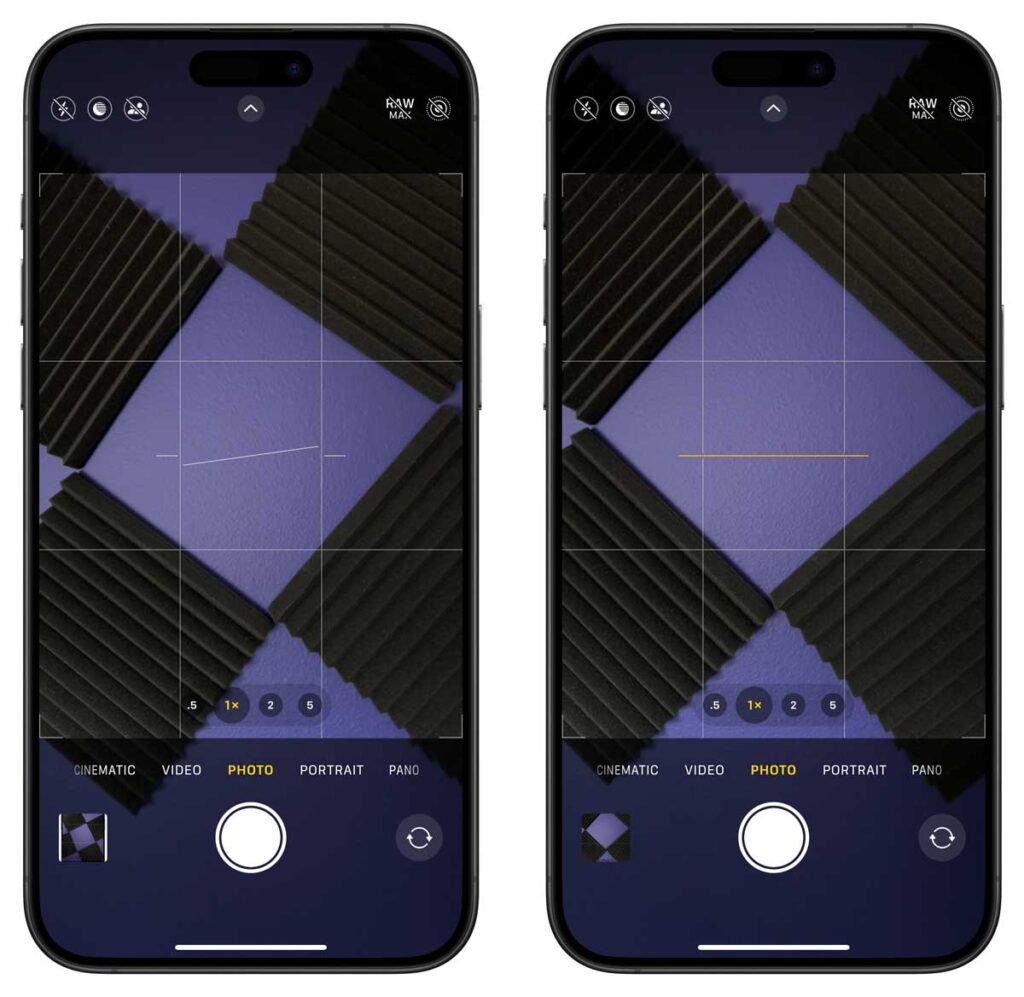
This can save you a lot of time by not having to make slight rotation adjustments to your images later after capture. There’s nothing that can ruin an otherwise-beautiful ocean sunset image than the viewer being concerned that all of the water is going to run out the left side of the (tilted) frame, and this is one of the easiest iPhone camera tips to turn this on.
Mirror Front Camera
We are used to seeing ourselves in mirrors and so that’s what we think we look like. But the thing with a mirror… is that it mirrors things. It flips them.
By default, the iPhone’s front-facing camera will show us a flipped or mirrored view of ourself when we look at it through the camera app. This shows us what we expect to see.
When we capture the image, it captures what’s actually in front of the camera lens. The non-flipped version of ourself.
What we see in the preview is what we think we look like. What gets captured when we take the image is what we actually look like.
Starting with iOS 14, Apple gave us the ability to have the viewfinder preview look exactly like the capture. We simply enable the Mirror Front Camera setting in the settings app. Now, what we see is what we’ll get.
View Outside the Frame
The biggest composition decision that a photographer makes is deciding what is in (or out of) the frame when they capture an image.
When View Outside the Frame is enabled, it allows you to see a bit wider than the actual viewfinder in the camera app.
Take a look at this image on top and note the semi-translucent areas on both sides of the viewfinder where you can see what’s in front of the camera but won’t be captured as part of the image. If we turn View Outside the Frame off, instead of that semi-transparent area showing us what’s just outside the frame, we see an opaque black area that doesn’t provide any additional information as shown below
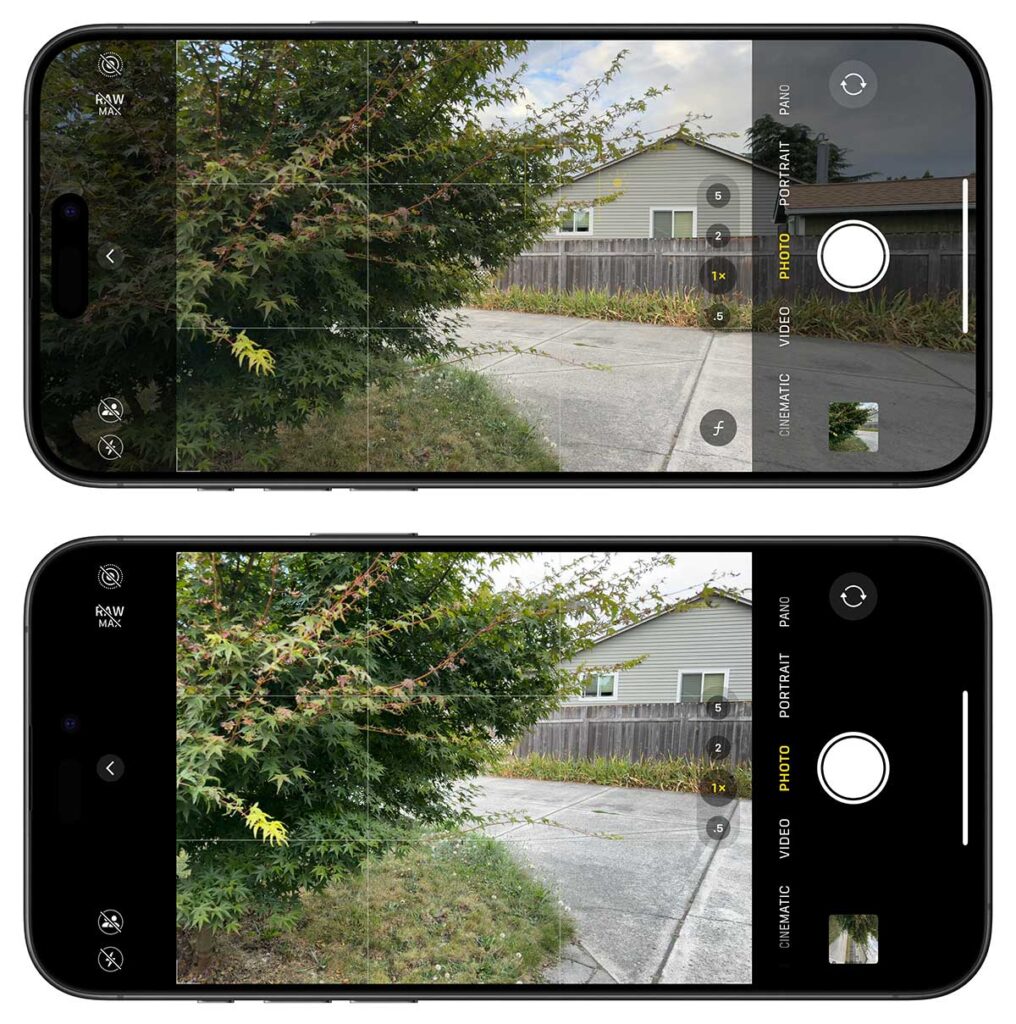
Either way, what gets captured is only what’s within the viewfinder, but being able to see a little bit more can sometimes be helpful for composition purposes.
Special iPhone Camera Modes
Broaden Your World: Panoramas
You probably know that you can capture panoramic images by choosing the “PANO” mode and then slowly moving the phone, using the arrow as a guide to stay level. You can switch the direction of the panoramic capture (left to right vs. right to left) by tapping on the arrow.

Long Exposures Live On
When the iPhone’s Live Photos option is enabled, it captures a very short video of the moments just before and after you tap the shutter button. One use for Live Photos is to create a long-exposure motion blur effect, as seen this carousel image below.
To create this sort of image, enable Live Photos (the target-looking icon in the top of the camera app should be yellow and not have a diagonal line through it). After capturing the image, go into the Photos app and open the image. In the upper left, find where it says “LIVE” and tap.
Then choose “Long Exposure” from the menu and you’ll see the results:
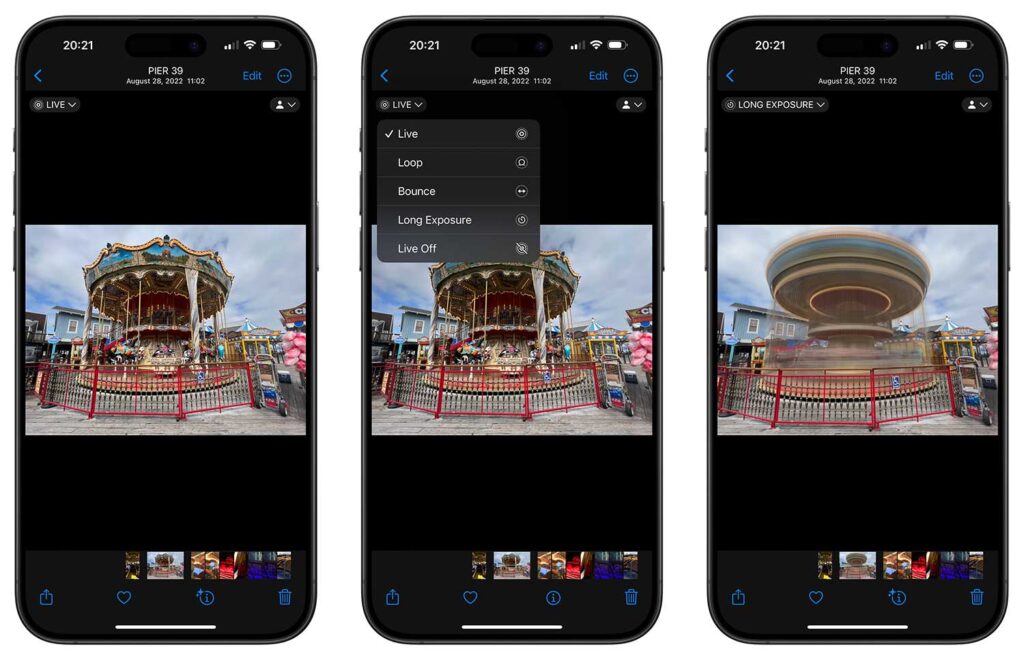
If you dig long exposure photography, I’d recommend you check out the Spectre Camera app from Lux, which gives you even more control.
Isolate the Subject with Portrait Mode
You likely know of Portrait Mode, which uses computational photography to simulate a shallow depth of field. The result is that the subject of the portrait is in sharp focus, while the background areas have a blur applied.
After you create a Portrait Mode photo, you can change the blur and lighting effects later. Go into the Photos app and find the photo in question. Tap on “Edit.”
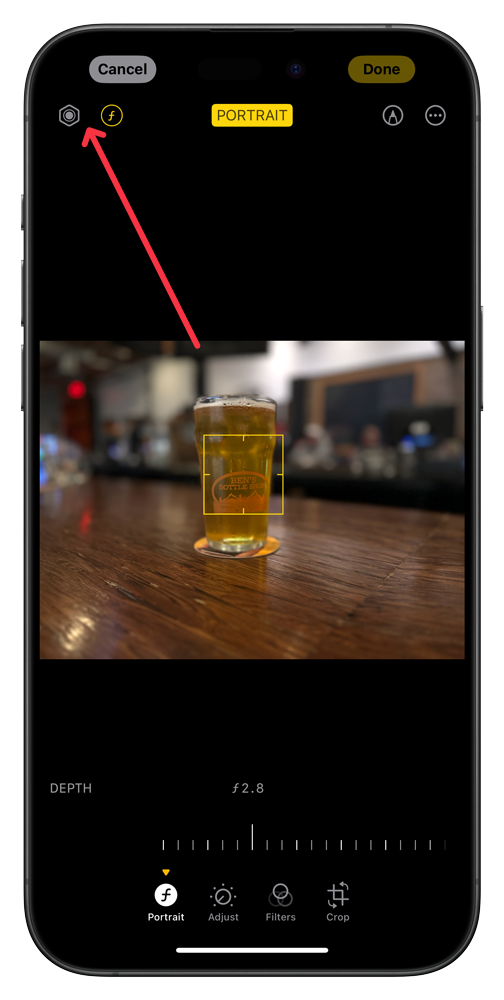
From here, you can hit the Depth Control button (right of the arrow in the screenshot above) to adjust the depth blur, or you can hit the Portrait Lighting button (left of the arrow) to adjust the lighting effect applied to the image.
Burst a Move
Burst mode captures a series of images in rapid succession. I’ve found various sources online that say the iPhone camera captures at 10 frames per second, but I haven’t yet been able to verify that through an official Apple source. To use Burst Mode, press and drag the camera app’s shutter button to the left, then release when you’re ready for it to stop capturing images.
Up Close: Macro Mode
On the iPhone 13, 14, and 15 Pro and Pro Max model phones, along with all iPhone 16 variations (the ones that have the .5x wide-angle camera), the phone will automatically switch into a macro mode for up-close photography when you get close to your subject. You can capture images as close as 2 cm!
When you get close, you’ll see a small flower icon appear. If you tap that icon, it turns off the automatic macro lens switching. If you want to disable the setting entirely, you can do that through the Settings → Camera → Macro control option.
F Words: File Formats
Photo file settings are found at Settings → Camera → Formats.
Under Camera Capture, “High Efficiency” will lead to .HEIC files, which is a lossy compression format that uses less storage space that JPG with similar image quality. I’ve used HEIC for years for most images and have never run into any problems with it. I recommend you do the same.
I said “most” images just above. I do capture in RAW as well, and this settings screen is where you enable that. When enabled, you’ll have the option to capture in RAW when you take a photo.
RAW photos are big and require a bit more editing work. If you don’t know that you need to capture in RAW, you don’t need to capture in RAW.
Managing Metadata
Assuming you’ve enabled the iPhone camera to use location services, the GPS coordinates of each photo you capture are embedded into the photo’s information. When you share the image with others or post it online, that embedded location information can be used to see where the image was captured.
If you don’t want the iPhone to ever save the location when you capture an image, you can disable that feature by going to Settings → Privacy & Security → Location Services → Camera.
If you want to selectively remove the location from a single image, you can do that in the iPhone’s Photos app. Go to the photo in question, then swipe up. You’ll see a map with the photo’s location. Tap “Adjust” and then “Remove Location.”
Sharing is Caring
Sure, there are plenty of options for sharing images after you create them, but with the iCloud Shared Photo Library you can do it automatically as you capture photos. If you have iCloud Shared Photo Library set up, go into Settings → Photos → Shared Library and ensure that Sharing from Camera is turned on. You’ll then have an icon in the iPhone camera screen that you can use to enable or disable sharing from the camera. When it’s enabled, images are automatically saved to the Shared library instead of your personal library.
What are your favorite iPhone camera tips that I didn’t mention? Leave a comment below.

Thanks for the tips!